Your Inbox
Use your Inbox to view and work claims that are assigned to you. Click Inbox on the top navigation bar to get started.

Working with your Inbox
Sort
To sort by one column, click the column name.
To sort by multiple columns, click the column name then hold down the shift key and click the next column name.
Filter
Under each column header you see a box. Depending on the column, enter the number or word you want to filter on in that box.
Manage Inbox columns
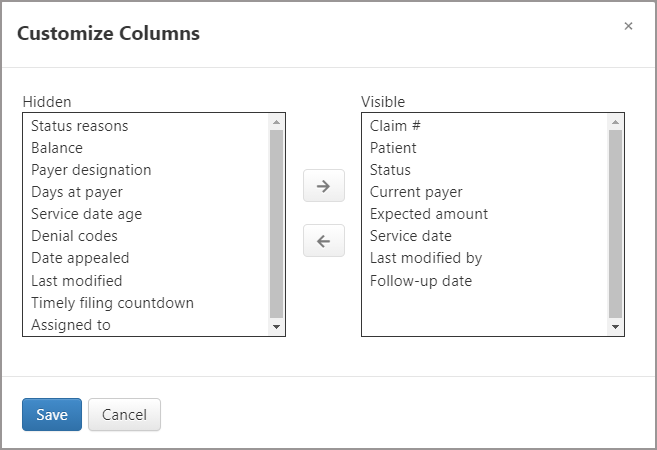
You can configure which columns of information displays in your Inbox. Click ![]() 'Customize columns' on the upper right. Move columns from hidden to visible (or the reverse) by clicking on the column name and then the direction arrow. Be sure to click Save when you are done.
'Customize columns' on the upper right. Move columns from hidden to visible (or the reverse) by clicking on the column name and then the direction arrow. Be sure to click Save when you are done.

Exporting your Inbox to a .csv file
Click "Download CSV" to create a .csv file.
Un-assign claims that are assigned to you
-
On the navigation bar, click Inbox.
-
To un-assign all claims:
-
Click the box at the top of the table next to the "Claim #" column.
-
Click the "Un-assign selected claims" button.
-
-
To un-assign one or more claims:
-
On the line of the claim you wish to un-assign, click the box next to the "Claim #" column.
-
Click the "Un-assign selected claims" button.
-
Working claims from your Inbox
There are several ways to work claims in your Inbox:
-
Select a claim number to enter into a workflow.
-
Pick the claims you want to work to create a customized work queue.
Workflow - work claims by oldest date of service/run number
Click a claim number in your Inbox to enter into a workflow where you will be served up the next oldest claim in your Inbox as you finish the first.
If you are done working the first claim, click Skip to next claim in the green bar at the top of the page to advance to the next claim. In this way, you can move through all of the claims that are assigned to you.
If you need to leave this workflow for any reason, you can come back to your Inbox and click a claim number to start up again.
Work queues from your Inbox
A work queue can be created from the Dashboard (made up of unassigned claims) or from your Inbox (made up of claims assigned to you).
-
Click Inbox on the navigation bar.
-
From the list of claims on your Inbox, check the box on the front of the row of the claims you want to work. As you click, the claim row will highlight in yellow.
-
When you are all done selecting claims, click Work selected claims. You will enter into a work queue as indicated by the green bar at the top of the page.
Go to the next claim: All done with the first claim? Click Skip to next claim.
Pick a claim: If you don't want to work the claims in the sequence they are being delivered, click View my queue. Click the claim number you want to work on from the list of claims that display in the window.
Cancel the work queue:
-
Click View my queue. A list of all the claims you put into your work queue displays in a window.
-
Click Clear queue.
Leave the queue and return later: You can leave the queue at anytime (even after you log off) and come back to the very spot you left. Just click Work queue on the navigation bar.

-